Duo for Jira Software - Duo Universal Prompt (Deprecated)
Last updated:
End of Support Information
The last date of support for Duo's two-factor solution for Jira Server was February 14, 2024. This coincides with Atlassian's end of support for Jira Server.
Duo will no longer provide updates or fixes for this application, and Duo Support will not provide configuration or troubleshooting assistance.
If you created a Duo Jira application before February 14, 2024:
- Your existing Duo Jira installation will continue providing two-factor authentication for user logins past the end of support of the traditional Duo Prompt on March 30, 2024 if you deployed the duo_universal_atlassian plugin.
- If you still use the legacy duo_jira plugin, it will keep working after March 30, 2024 but will cease working when the future end-of-life date of the traditional Duo Prompt arrives.
- You may view and manage existing Duo Jira applications in the Duo Admin Panel.
- No new Duo Jira applications may be created in the Duo Admin Panel.
- Duo no longer provides support or troubleshooting help, except as needed to assist you with migration to Duo Single Sign-On with Atlassian Cloud or Jira Data Center.
If you did not create a Duo Jira application before February 14, 2024:
- No new Duo Jira applications may be created in the Duo Admin Panel.
- Duo no longer provides support or troubleshooting help, except as needed to assist you with migration to Duo Single Sign-On with Atlassian Cloud or Jira Data Center.
We recommend that you migrate your on-premises Jira application to Atlassian Cloud and add Duo login protection with Duo Single Sign-On for Atlassian Cloud.
If you opt to deploy Jira Data Center, you can add Duo login protection with Duo Single Sign-On for Generic SAML Service Providers. The duo_universal_atlassian or duo_jira MFA plugins are not valid for Jira Data Center.
Review the Duo End of Sale, Last Date of Support, and End of Life Policy.
Support for the traditional Duo Prompt experience and Duo Prompt delivery via iframe ended on March 30, 2024.
See the update instructions for Jira to update an existing deployment of the iframe-based Jira software to the latest release. Authenticating once with the updated Duo software is a required step before you can enable the Duo Universal Prompt for your existing Jira application.
Please visit the Duo Universal Prompt Update Guide for more information about the traditional Duo Prompt end of support.
The instructions for this solution were removed on March 31, 2025. Customers who had this configuration deployed before then and need to refer to the original instructions to execute the migration to a supported solution may contact Duo Support.
Troubleshooting
Need some help? Take a look at the Jira Frequently Asked Questions (FAQ) page or try searching our Jira Knowledge Base articles or Community discussions. For further assistance, contact Support.
Network Diagram
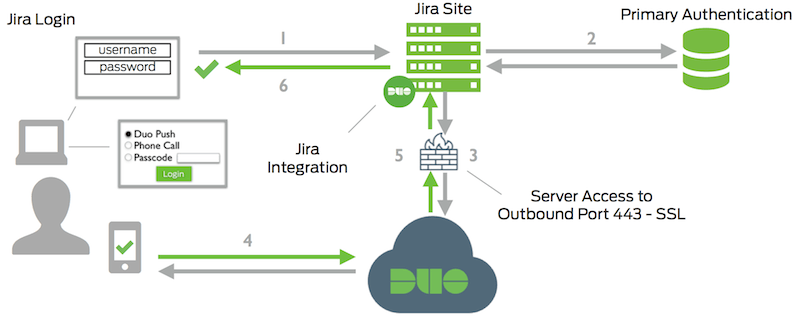
- Jira connection initiated
- Primary authentication
- Jira connection established to Duo Security over TCP port 443
- User completes Duo two-factor authentication via the interactive web prompt served from Duo's service and their selected authentication factor.
- Jira receives authentication response
- Jira session logged in