Duo Device Management Portal for End Users
Last updated:
Simplify self-service device management for your users with a Duo-hosted portal secured by Duo Single Sign-On and featuring the new Universal Prompt experience. Try Duo Central today!
Self-hosted Duo Device Management Portal applications based on Duo Web SDK v2 are not compatible with the Universal Prompt and reached the end of extended support on September 30, 2024.
Duo has updated the Device Management Portal with Universal Prompt support. You will need to update your on-premises Duo Device Management applications to use Duo Web SDK v4. Authenticating to your device management portal once with the updated Duo software is a required step before enabling the Duo Universal Prompt device management experience.
Overview
The Duo Device Management Portal is a standalone version of our self-service portal available to Duo Premier, Duo Advantage, and Duo Essentials plan customers. Instead of presenting device management options alongside the Duo login prompt for a protected service, this application puts your users directly into the device management interface and can be deployed independently from any other service requiring Duo two-factor authentication for access.
The Device Management Portal permits users new to Duo to enroll their first authentication device, while also allowing existing users to add and remove authentication devices or configure options for their devices without needing to contact IT staff for help.
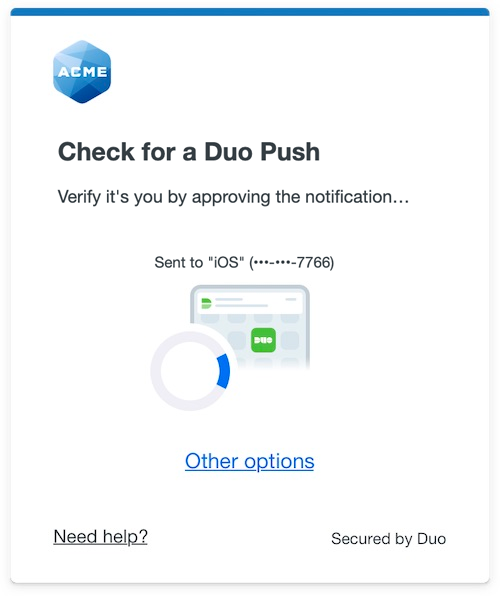
See our end-user guides to Managing Your Devices to learn more about the self-service tasks available to users and Enrollment to see the enrollment process. Additionally, the Duo prompt presented to users from the Device Management Portal does not attempt an automatic push or phone call, and also doesn't attempt to automatically choose a device like Universal Prompt.
Before deploying the Duo Device Management Portal you'll need an on-premises web server, configured for primary authentication to your user directory (such as AD or OpenLDAP). You should be familiar with your web application's programming language and authentication process.
Then you'll add the Duo Device Management Portal into your site with the Duo Web SDK v4 by adding a redirect to Duo. After successfully passing primary credentials and approving Duo authentication, users gain portal access. When a user has finished updating devices, they should close the page to end the session.
Web SDK v4 client libraries are available for:
- Python (duo_universal_python)
- Java (duo_universal_java)
- C# (.NET) (duo_universal_csharp)
- Go (duo_universal_golang)
- Node.js (duo_universal_nodejs)
- PHP (duo_universal_php)
Duo Universal Prompt
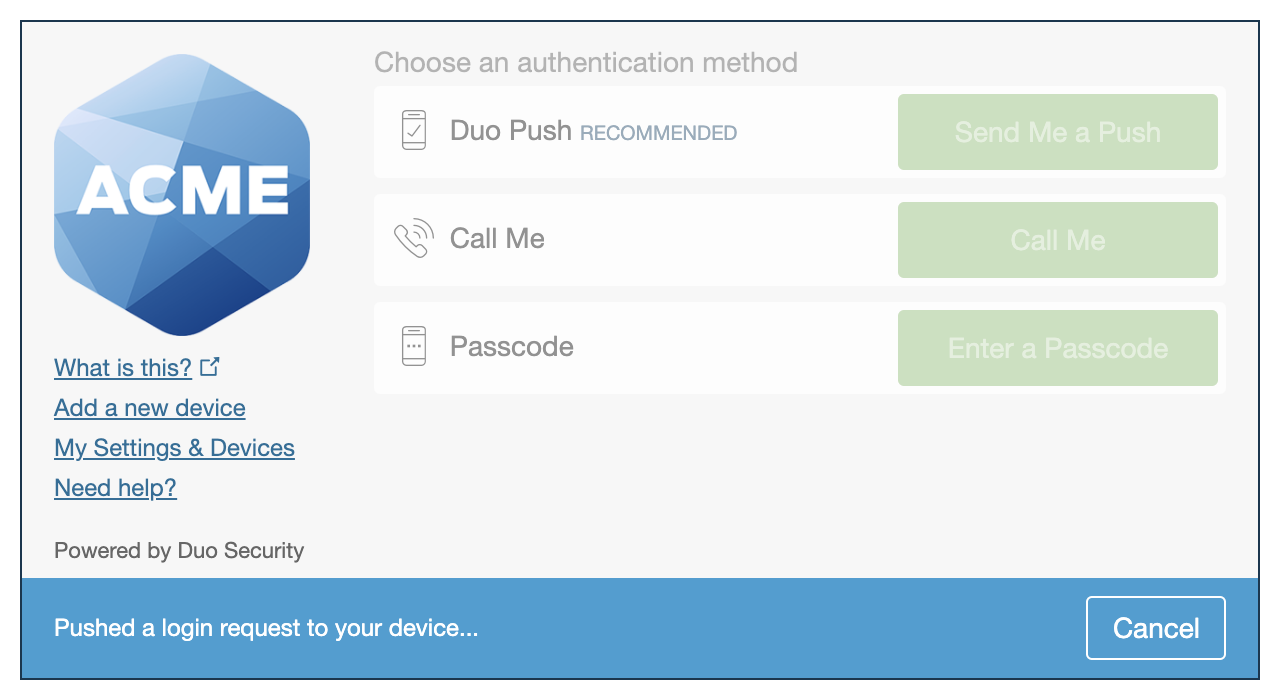
The Duo Universal Prompt provides a simplified and accessible Duo login experience for web-based applications, offering a redesigned visual interface with security and usability enhancements.
| Universal Prompt | Traditional Prompt |
 |
 |
Read the Universal Prompt Update Guide for more information about the update process and the new login experience for users.
Migration to Universal Prompt for your Device Management Portal application will be a three-step process:
- You update your on-premises Device Management Portal application from Duo Web SDK v2 to Duo Web SDK v4, which will implement a redirect to Duo during device management authentication to support the Universal Prompt.
- Access device management using the updated application so that Duo makes the Universal Prompt activation setting available in the Admin Panel. This first authentication after updating will show the traditional Duo device management experience in a redirect.
- From the Duo Admin Panel, activate the Universal Prompt experience for users of that Duo Device Management Portal application. Once activated, all users of the application will see the Duo Universal Prompt device management experience in a redirect.
Duo has made the necessary service changes to support Universal Prompt. You will need to update your application to use Duo Web SDK v4. You will then need to return to the details page to activate the Universal Prompt for your Device Management Portal users.
-
For new Web SDK applications, new Device Management Portal applications have the Universal Prompt activated by default.
-
For existing Web SDK applications, you will need to activate the Universal Prompt. For more information, refer to Upgrade Guidance.
If you do not want to continue maintaining an on-premises Device Management Portal application server, then you can deploy Duo Single Sign-On and enable the self-service portal in Duo Central to provide device management access to users outside of authentication to a protected application.
Duo Prompt UI Support per Delivery Method
| OIDC Redirect (Web SDK v4) | Iframe (Web SDK v2) | |
|---|---|---|
| Universal Prompt | YES | NO |
| Traditional Prompt | YES | YES |
New Web Device Management Portal Applications
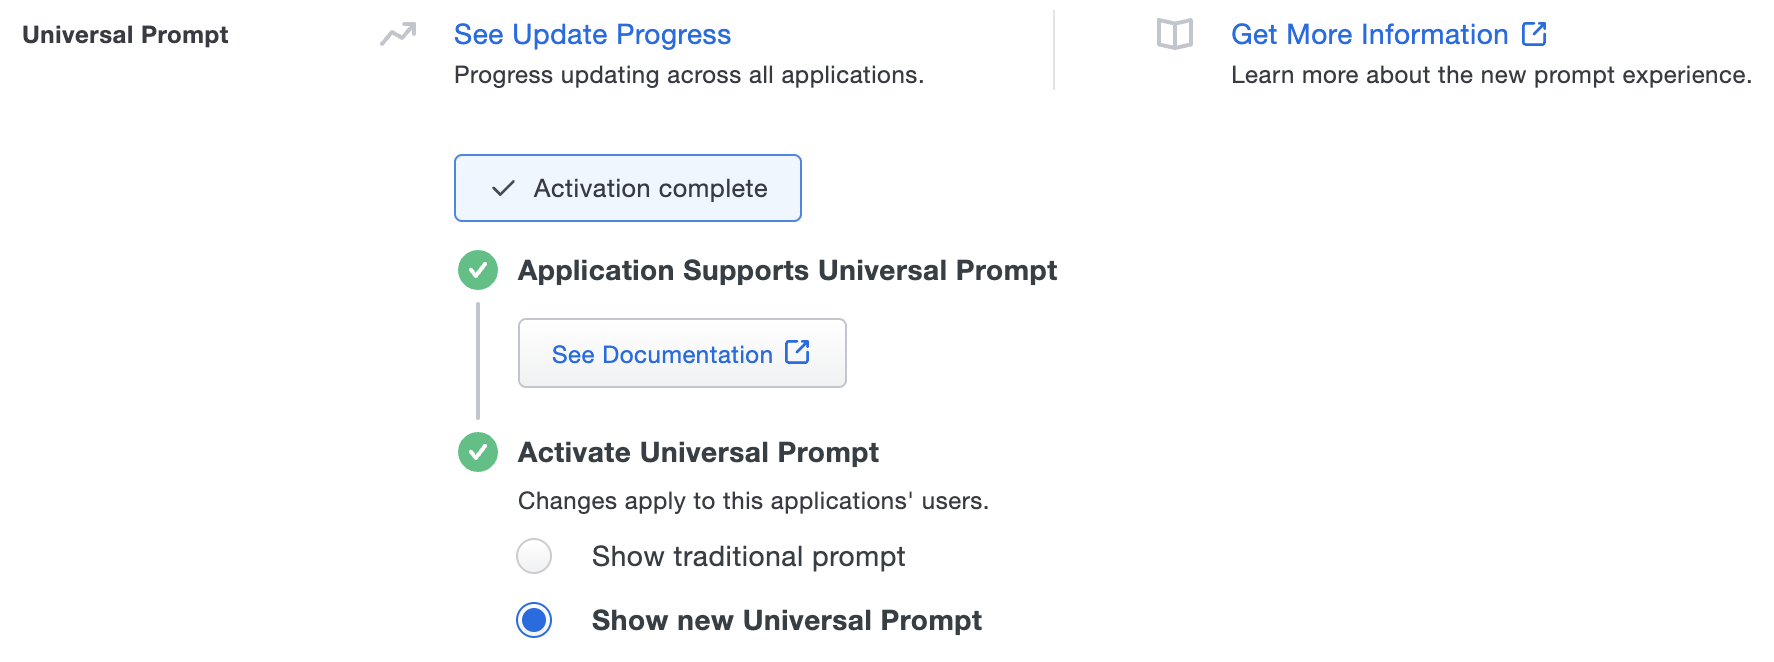
The "Universal Prompt" section on the details page of your new Device Management Portal application shows the status as "Activation complete", with these activation control options:
-
Show traditional prompt: Your users experience Duo's traditional prompt when logging in to this application.
-
Show new Universal Prompt: (Default) Your users experience the Universal Prompt when logging in to this application.

Existing Device Management Portal Applications
The "Universal Prompt" section on the details page of your existing Device Management Portal application will show the status as "Update required" with a link to update instructions.
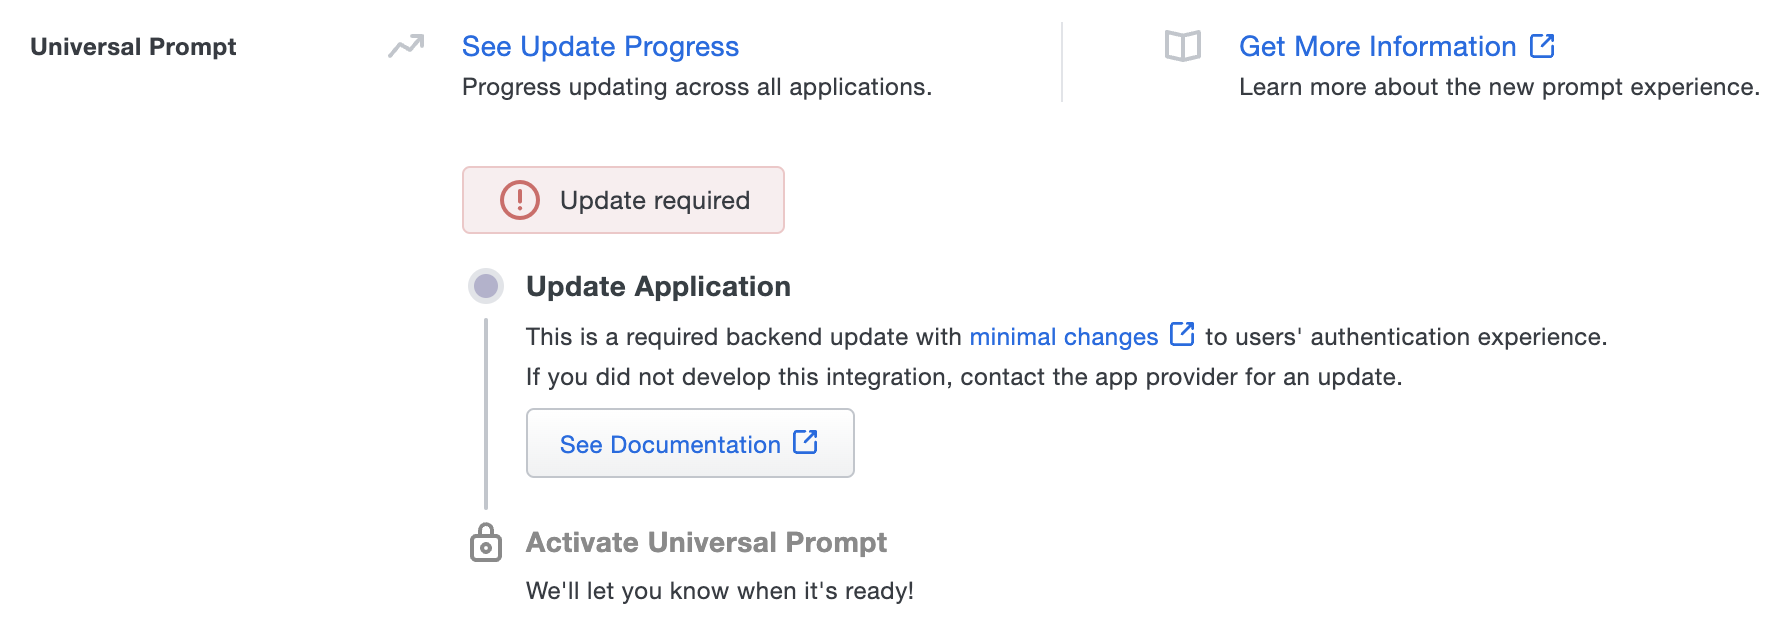
Once you update your Duo integration to use Web SDK v4, and a user authenticates to that existing application via the frameless Duo v4 SDK, the "Universal Prompt" section of the Duo Web application page reflects a status change to "Ready to activate", with these activation control options:
-
Show traditional prompt: (Default) Your users experience Duo's traditional prompt via an iframe when logging in to this application.
-
Show new Universal Prompt: Your users experience the Universal Prompt via redirect when logging in to this application.

In addition, the "Integration key" and "Secret key" property labels for the application update to "Client ID" and "Client secret" respectively. The values for these properties remain the same.
Activate Universal Prompt
Activation of the Universal Prompt is a per-application change. Activating it for one application does not change the login experience for your other Duo applications.
Enable the Universal Prompt experience by selecting Show new Universal Prompt, and then scrolling to the bottom of the page to click Save.
Once you activate the Universal Prompt, the application's Universal Prompt status shows "Activation complete" here and on the Universal Prompt Update Progress report.
Should you ever want to roll back to the traditional prompt, you can return to this setting and change it back to Show traditional prompt. Keep in mind the September 30, 2024 end-of-extended-support date for the traditional Duo prompt in the device management application.
Universal Update Progress
Click the See Update Progress link to view the Universal Prompt Update Progress report. This report shows the update availability and migration progress for all your Duo applications that will have Universal Prompt support. Note that you can not activate the new prompt experience for Device Management Portal applications from the report page.
Watch the Duo Blog for future updates about the Duo Universal Prompt.
First Steps
Before starting:
- Sign up for a Duo account if you don't already have one.
- Log in to the Duo Admin Panel and navigate to Applications → Application Catalog.
-
Locate the entry for Device Management Portal with the "2FA" label in the catalog. Click the + Add button to create the application and get your Client ID, Client secret, and API hostname. You'll need this information to complete your setup. See Protecting Applications for more information about protecting applications with Duo and additional application options.
Previously, the Client ID was called the "Integration key" and the Client secret was called the "Secret key".
- No active Duo users can log in to new applications until you grant access. Update the User access setting to grant access to this application to users in selected Duo groups, or to all users. Learn more about user access to applications. If you do not change this setting now, be sure to update it so that your test user has access before you test your setup.
This setting only applies to users who exist in Duo with "Active" status. This does not affect application access for existing users with "Bypass" status, existing users for whom the effective Authentication Policy for the application specifies "Bypass 2FA" or "Skip MFA", or users who do not exist in Duo when the effective New User Policy for the application allows access to users unknown to Duo without MFA.
- Use NTP to ensure that your server's time is correct.
This application communicates with Duo's service on SSL TCP port 443.
Firewall configurations that restrict outbound access to Duo's service with rules using destination IP addresses or IP address ranges aren't recommended, since these may change over time to maintain our service's high availability. If your organization requires IP-based rules, please review Duo Knowledge Base article 1337.
Effective June 30, 2023, Duo no longer supports TLS 1.0 or 1.1 connections or insecure TLS/SSL cipher suites. See Duo Knowledge Base article 7546 for additional guidance.
To ensure no users unintentionally bypass the portal, we recommend applying a new custom application policy to your Device Management Portal application with the following settings:
- New User Policy: "Require Enrollment"
- Authentication Policy: "Enforce 2FA"
- User Location: No locations set to "Allow access without 2FA"
- Remembered Devices: "Do not remember devices"
Also verify that users who need to manage their devices via the portal have active or bypass status.
Migrate from Web SDK v2
See the Universal Prompt Update Guide for an overview of the Duo Universal Prompt and its advantages over the previous Web SDK.
The Web SDK v4 Universal Prompt Web SDK is a brand new experience with a substantially different integration flow from the previous Web SDK v2.
Web SDK v4 has some key technical differences from Web SDK v2:
- No longer displays the Duo Prompt or Device Management UI in an iFrame on your website. The prompt is now hosted on Duo’s servers and displayed via HTML redirects. It is not possible to embed the v4 prompt in an iFrame.
- No longer requires you to generate and use an
akeyvalue. - Provides a health check to ensure that Duo’s servers are fully up and reachable from the client before attempting the Duo authentication.
- Requires a
client idandclient secretinstead of anikeyandskey(note that these are the same values, relabeled with new names in v4). - When an existing Web SDK v2 application completes its first authentication using Web SDK v4, the corresponding "Web SDK v4" application in the Duo Admin Panel updates to reflect new v4 terminology and functionality. Web SDK v2 clients continue to function with this Duo application.
- Uses HMAC SHA-512 signing.
There are some additional considerations for migrating the Device Management Portal application to Web SDK v4 which include:
-
When you create a Client() object, enter
http://localhostas the redirect URI. Note that the redirect URI will never be used since there is no post-authentication redirect back to a protected application for this application. -
When using the URL created by the
create_auth_url()function, ensure it opens in a new browser tab or window so your users can return to your custom web application to review instructions and/or perform other tasks after they have enrolled.
If you already have an existing Device Management Portal application, you do not need to create a new one to migrate it to Web SDK v4. You may reuse that existing integration with your Web SDK v4 updated application.
Note: After upgrading your Application to use Web SDK v4, you will still see the traditional Duo Prompt authentication and device management experience until you activate the Duo Universal Prompt for that application.
Instructions
To deploy a new Device Management Portal application:
-
Enter
http://localhostas the redirect URI. Note that the redirect URI will never be used since there is no post-authentication redirect back to a protected application for this application. -
When using the URL created by the
create_auth_url()function, ensure it opens in a new browser tab or window so your users can return to your custom web application to review instructions and/or perform other tasks after they have enrolled.
You can now access the Device Management Portal with the Universal Prompt experience. Users can securely end their device management session by clicking Logout. Sessions not explicitly ended via logout automatically terminate after 15 minutes.
Grant Access to Users
If you did not already grant user access to the Duo users you want to use this application be sure to do that before inviting or requiring them to log in with Duo.
Upgrade Guidance
To update your existing Device Management Portal application to Duo Web SDK v4 for Universal Prompt support (these instructions are the same as for deploying a new one, except that you are removing your existing Web SDK v2 code and dependencies and replacing with Web SDK v4):
-
Follow the instructions in the Web SDK v4 documentation to upgrade from Web SDK v2.
When you create a Client() object, enter
http://localhostas the redirect URI. Note that the redirect URI will never be used since there is no post-authentication redirect back to a protected application for this application.When using the URL created by the
create_auth_url()function, ensure it opens in a new browser tab or window so your users can return to your custom web application to review instructions and/or perform other tasks after they have enrolled. -
After you have updated to the Web SDK v4 (or OIDC Auth API), access the Device Management portal. Log in with Duo 2FA using the updated application and the hostname or fully-qualified domain name URL, so that Duo makes the Universal Prompt activation setting available in the Admin Panel.
-
From the Duo Admin Panel, activate the Universal Prompt experience on the Device Management Portal application page by clicking Show new Universal Prompt and then scroll to the bottom of the page and click Save.
You can now access the Device Management Portal with the Universal Prompt experience. Note that there is a logout button so that users can securely end their Device Management Portal session. Sessions not explicitly ended using the logout button will automatically terminate with a 15-minute timeout.
Network Diagram
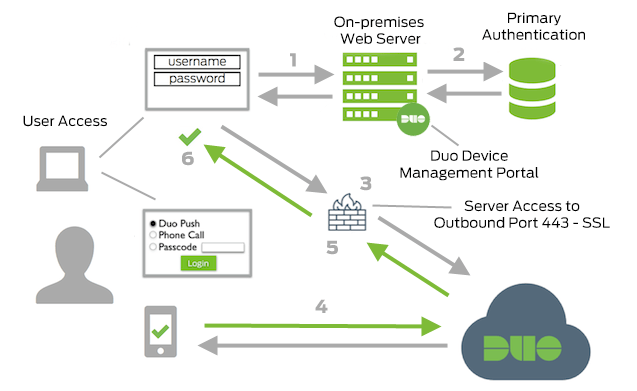
- Connection to on-premises device management site initiated
- Primary authentication
- Web application connection established to Duo Security over TCP port 443
- Secondary authentication via Duo Security’s service into the Device Management Portal
- Web application receives authentication response
- Device management session initiated